Outdoor Kitchen - Please share photos if you have them.

petrel-TC

Senior Member
Joined
Jun 6, 2012
Messages
376
Location
Spotsylvania
As you can see from my other posts, I'm trying to get my winter upgrade projects all lined up. I am scheduled to have my left hip replaced tomorrow. Assuming I survive the surgery to become ambulatory again, I want to be ready to dive in on some truck upgrades in a few months.

If you have engineered any sort of built in/pull out storage bay kitchen, please share photos or at least your thoughts on such a project. I can find dozens of images of outdoor kitchens in class As, travel trailers, and 5ers, but none for truck conversions.

It is my hope to engineer some sort of pull out kitchen that would house my 2-burner cook top, portable propane grill, electric skillet, and also afford a little storage for cooking utensils.
 
Good luck on the hip! All the cooking I do outside on the Grill. We do everything else inside. I been wondering how to mount the grill on a tray in the bottom bay, My doors raise up, sonow I have the Sam designed tray figured out, now I have to figure out the way to raise it from the tray to a good working height. Oh and clearing the door too.
Sam
 
Thanks! We try to cook outside as much as possible. However, hot weather will certainly run me inside.

I am contemplating some sort of cabinet mounted on a 100% slide out, with drawer type slides extending out further for the cooking equipment. One of these:Rev-a-Shelf Heavy-Duty Mixer Lift, may work to lift things up to a comfortable working height.
 
I use a blackstone grill for cooking and I bought a small folding sink table(used for cleaning fish, sold on amazon) i set these up outside and use a second hose for the sink. Both the table and the grill fold up and go in one of my storage bins.
 
I have a similar arrangement now with a folding table. It works fine, but sometimes I am just too lazy to set it all up.
 
Not necessarily for outdoor kitchen, but i bought a set of 10 heavy duty drawer slides to convert my basement storage to be on slide-outs. I still need to complete this project, but the drawer slides are rated for 100 lbs each. You can get higher weight, but the cost starts to jump considerably above 100 lb weight rating.

I also use the small folding table to set the grill on, when I don't have a picnic table handy.
 
I know it will require a series of slide mechanisms to accomplish my goal. How did you go about fastening the slides to the storage boxes?
 
I know it will require a series of slide mechanisms to accomplish my goal. How did you go about fastening the slides to the storage boxes?

Have not gotten that far yet. Still need to imagineer the end result. I have only purchased the slides, and have been figuring out how to make it work. I think I will just attach the slides to the sides of the storage compartment, with some shims as needed for alignment. The basic drawer slide will be plywood, with a piece of angle at each side to attach the plywood to the slide mechanism. So I will lose approx 1-1.5 inch in height due to the plywood and clearance from the floor.

My main purpose is just for easier access to the boxes, all of my basement doors hinge at the top. Several are limited by the slide-out for how high they can swing up. So having the slide enables me to pull the contents out and less kneeling or crouching down on the ground.

I bought 10 sets of slides for cheap on ebay. Enough to do all the boxes I need.
 
hows the hip?
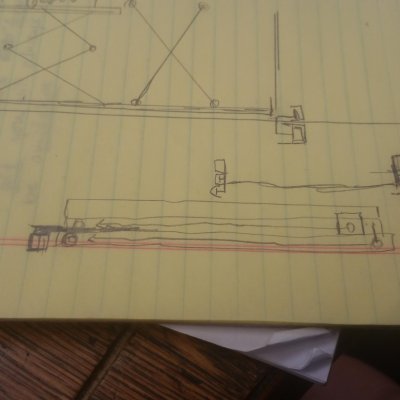
I have a roller design for my slide out trays for the basement. I am using garage door track and rollers. L brackets will attach to the door track and bottom of the storage box, and the bottom lip of the box will be the stop. A roller will be in the center of the tray mounted to the bottom front lip of the box. 12 in long I think will work for the roller. I have drawn this out for me, but it would not make any sense to you. I have also figured out how to extend it farther with a second track. It make it where you could have double the depth of your basement box. Now to find the time to build it....

Sam
 
The hip is mending amazingly well. The instantaneous pain relief is nothing short of astounding! Thanks for asking.

I am assembling a picture of what your are describing in my head. The extra extension that you describe is key.

As soon as I can get back out to my shop, I want to start on a mock up of my kitchen. If you get around to your project, please post a few photos if you have time.
 
here is a terrible drawing of my plan
 

Attachments

  • 20171006_154747.jpg
    20171006_154747.jpg
    104.2 KB · Views: 9
I think I follow you. You are doubling the glides to get the extension that you want. What sort of cabinet or stand will you use from there?

I'm not sure if this is a cop out or an epiphany, but today I was contemplating just installing a MorRyde Freezer tray in the storage space, then placing a DeeZee tread plate tool box on it. I think I could then secure my propane cooktop to the top of the tool box, and store my propane grill and electric griddle inside. I could then cover the back of the flip down toolbox door with HDPE or Corian, so it could be used as a work surface or a place to set up either cooking device.

Although it will be a bit cobbled together, it may look cleaner than if I make my primitive attempt at engineering drawers or some sort of cabinetry. I am no woodworker. I may be less apt to set the aluminum on fire, plus I can't decide what sort of material would look the best.

The bays are carpeted, the cooktop is welded aluminum, and the grill is stainless, but I don't think a carpeted cook area would work. I'm afraid that oak or hickory cabinetry would look odd around all that fiberglass, black carpet, aluminum and stainless steel. I was even thinking about a welded steel framework with butcher block inserts, but I fear a bit of moisture in the storage bin would cause mold or mildew on the butcher block.

This solution is quite spendy, and not a great working height, but it may make for a clean installation. In addition, the "cooking unit" could be lifted out to free up the storage if necessary.

I am told that I will be able to get out and maybe take some measurements this weekend. I I will see how far off I am then. Thank you for sharing your thoughts and your project with me.
 
I was thinking of using a sheet of plywood with short sides, and cover the bottom with stainless or tread plate to make it pretty and easy to clean. I have carpeted storage too. I am thinking when I do this drawer I will use all the space from top to bottom, now I only use what will set on top of something else... I believe with my grill I am going to be able to keep things neat and clean and would only use that area for grilling the food only, do the prep inside. I always have to fight the mosquitos when I cook.

Sam
 
Making better use of the vertical space is part of my objective too. I'm hoping that this arrangement will actually free up some space.

You are a better man than me. If I had to routinely face mosquitos, I'd be cooking inside!
 
I did a couple things in 2 different bays. One bay, I made a large box out of plywood and used banding to cover up the edges. I attached the drawer slide to 2x4's mounted to the bottom of the bay. I added another slide part way up and attached to one wall. That seems to help with heavier weight. This bin is for water and drinks. Since in a prior RV we got damage due to a leak we poly urethaned it to be water proof. The bin has higher sides. and the "lid" is another bin that can slide back words and attached to the higher walls. This top bin holds the grill. The top bin has a magnet at the box to hold it into the box. So when you pull the big bin, the bin is open with the grill staying in the bay. To use the grill we pull it and the lower bin out. I made a tray with a "leg" that is a slot that fits between the gap do to the slide so I have a side table for the grill.

In the other bay, I build a wood frame that mounts to the floor of the bay with some screws. That frame holds Ikea wire baskets that slide out. I did this so I could remove the baskets and then remove the frame if needed to service. This bay has all of the electrical systems (chargers, inverter, breakers etc.) so I can get easy access to them versus a pile of stuff I need to take out.
 
Thanks for sharing your solutions. I think I have a picture of it in my head. If you get a chance to post a photo, I would appreciate it.
 
I did a couple things in 2 different bays. One bay, I made a large box out of plywood and used banding to cover up the edges. I attached the drawer slide to 2x4's mounted to the bottom of the bay. I added another slide part way up and attached to one wall. That seems to help with heavier weight. This bin is for water and drinks. Since in a prior RV we got damage due to a leak we poly urethaned it to be water proof. The bin has higher sides. and the "lid" is another bin that can slide back words and attached to the higher walls. This top bin holds the grill. The top bin has a magnet at the box to hold it into the box. So when you pull the big bin, the bin is open with the grill staying in the bay. To use the grill we pull it and the lower bin out. I made a tray with a "leg" that is a slot that fits between the gap do to the slide so I have a side table for the grill.

In the other bay, I build a wood frame that mounts to the floor of the bay with some screws. That frame holds Ikea wire baskets that slide out. I did this so I could remove the baskets and then remove the frame if needed to service. This bay has all of the electrical systems (chargers, inverter, breakers etc.) so I can get easy access to them versus a pile of stuff I need to take out.


Ok Doug,

You have to send pictures now. So we can see how it works and such, more the better!

Sam
 
20171011_163910.jpg

20171011_163920.jpg

20171011_163940.jpg

20171011_163949.jpg

I actually used semi trailer door hinges to mount my exterior door and built the grill right on the door. I have a "big gas grill 2" mounted on a frame that swings open flush with the side of the truck. I mounted the grill so that it swings out and is 14 inches away from the side of the truck so that it doesn't splatter the truck.
 

Try RV LIFE Pro Free for 7 Days

  • New Ad-Free experience on this RV LIFE Community.
  • Plan the best RV Safe travel with RV LIFE Trip Wizard.
  • Navigate with our RV Safe GPS mobile app.
  • and much more...
Try RV LIFE Pro Today
Back
Top