Journey with Confidence RV GPS App RV Trip Planner RV LIFE Campground Reviews RV Maintenance Take a Speed Test Free 7 Day Trial ×

Go Back   Truck Conversion & Toterhome Community > Truck Conversion Talk > Building Your Own
Click Here to Login
Register FAQ Community Calendar Today's Posts Log in

Join Truck Conversion Today
Reply
 
LinkBack Thread Tools Search this Thread Display Modes
 
Old 05-23-2014, 06:27 AM   #1
Junior Member
 
Join Date: Jan 2014
Location: Ofallon
Posts: 17
Default Suggestions on Interior Walls

This is a great site!

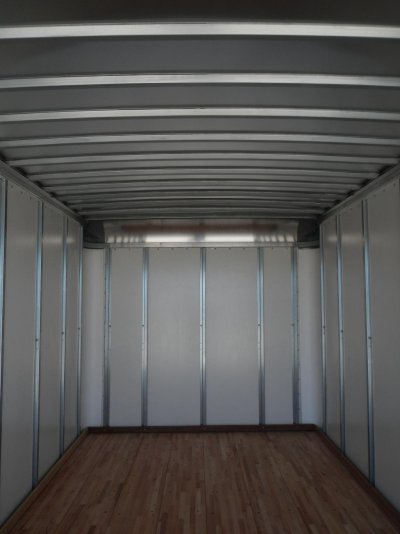
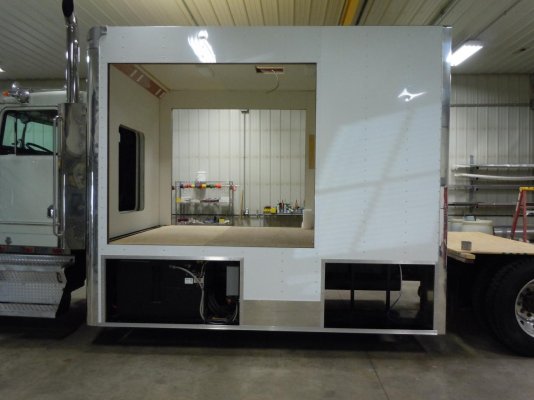
I plan to start an internal fit-out of a 14' FRP Morgan cargo body attached to a Fuso FG 4x4 and I'm in need of advice on how to finish the interior walls in the attached photo.

Does anybody have suggestions as to how to mount paneling to the steel studs?

Should I mount wood strips to the steel studs and secure the paneling to them?

I'm sure there's going to be more questions forth coming as the job progresses.

Thanx in advance!
Attached Thumbnails
DSCN0700_50.jpg  
__________________

LoupGarou is offline   Reply With Quote
Old 05-25-2014, 01:56 PM   #2
Senior Member
 
RLPRACING's Avatar
 
Join Date: Apr 2012
Location: Elyria
Posts: 108
Default

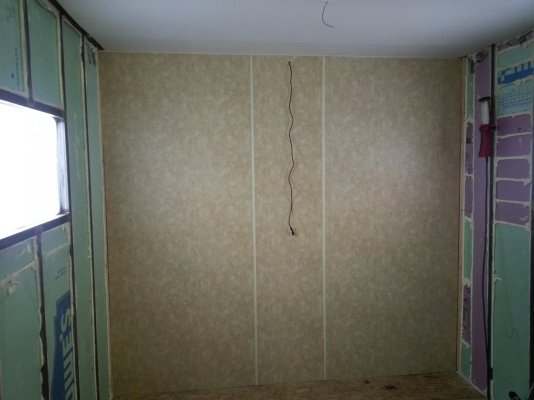
We use Panolam 1/4" nylon rivets we got at Lowes. In the pic they are hard to see. We only used 3 per panel there because the steel was on 2' centers. We also used their corner and divider trim. We used double sided tape and construction adhesive behind them. Both worked but the tape is easier. Same with the ceiling. Windows, cabinets, door frames and interior walls will also help support the paneling.
Attached Thumbnails
20131207_153857.jpg  
__________________

RLPRACING is offline   Reply With Quote
Old 05-25-2014, 05:36 PM   #3
Junior Member
 
Join Date: Jan 2014
Location: Ofallon
Posts: 17
Default

RLPRACING

Thanx for responding!

I reviewed some of your posts about your build...AWESOME!

So I take it you applied the adhesive along the length of the steel studs only and not to the foam panels?

Where the seams of the panels came together, did the divider strips fall somewhere between the steel studs?

When you hung your cabinets, did you use toggle fasteners into the steel studs to secure them?

I've been thinking of using white FRB panel in the ceiling, but my reaearch uncovered recommendations not to do so. What maternal did you use?
LoupGarou is offline   Reply With Quote
Old 05-26-2014, 06:18 AM   #4
Senior Member
 
RLPRACING's Avatar
 
Join Date: Apr 2012
Location: Elyria
Posts: 108
Default

Quote:
Originally Posted by LoupGarou View Post
RLPRACING


So I take it you applied the adhesive along the length of the steel studs only and not to the foam panels?Yes, just on the studs

Where the seams of the panels came together, did the divider strips fall somewhere between the steel studs? We cut each panel so the divider fell on a stud.

When you hung your cabinets, did you use toggle fasteners into the steel studs to secure them?We hung them like you would cabinets in a house but instead of using wood screws, we using self tapping sheet metal screws. #10's and #12's, which ever I had and as long as the stud would allow without going through the other side.So we had to find the studs just like in a house and drilled a hole through the cabinet making sure we drilled through the boards at the top and bottom of the cabinet. After the cabinet was up, we used wood screws to screw the cabinets together side to side. In some cases, where the end cabinet is against a corner, its screwed to that wall too. So they are all kind of one unit and a lot of screws would have to loosen up before a cabinet could fall.

I've been thinking of using white FRB panel in the ceiling, but my reaearch uncovered recommendations not to do so. What maternal did you use?
Don't know why you cant use FRP but we got our wall and ceiling paneling at a RV surplus outlet so its "real" RV material. Its wood backed with a vinyl paper decorative covering. Its a little thinner than the paneling you would buy at Lowes so we did use the vinyl corners/dividers that's made for FRP, not the paneling ones. Just pulling a number out of the air, lets say the one is for 3/16" material and the other 1/4". Lowes carries both.


Going back to your original post you asked about putting wood strips on the steel. If you were to do that, it may insulate that area a little better than ours. When its zero degrees outside, that cold goes right through our skin and steel stud and all we have is that thin wall board to kind of stop it. You can feel where every stud is.

Keep the questions coming!
RLPRACING is offline   Reply With Quote
Old 05-26-2014, 09:50 AM   #5
Senior Member
 
mmmc101's Avatar
 
Join Date: Feb 2009
Location: Choctaw,Okla
Posts: 174
Default

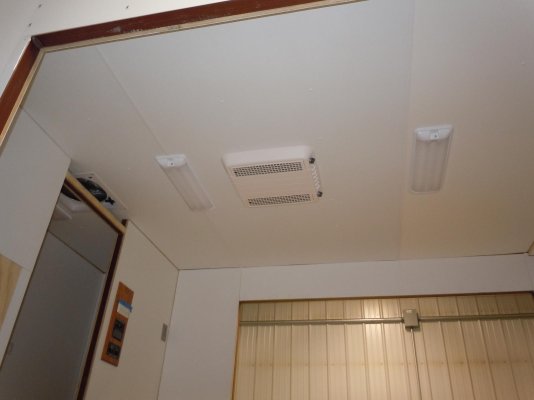
To reduce the temp transfer thru the studs I lined the inside of mine with 17/32 plywood. I then glued the FRP to that. I used it on the entire interior. FRP is easy to clean,durable and does not absorb odors like some materials. I guess it all depends on how you are going to use it and what you want it to look like.
Michael
Attached Thumbnails
DSCN0147.jpg   DSCN0074.jpg  
mmmc101 is offline   Reply With Quote
Old 05-27-2014, 05:05 AM   #6
Junior Member
 
Join Date: Jan 2014
Location: Ofallon
Posts: 17
Default

RLPRACING & mmmc101

Keep the suggestions coming, I'm open to all thoughts and ideas.

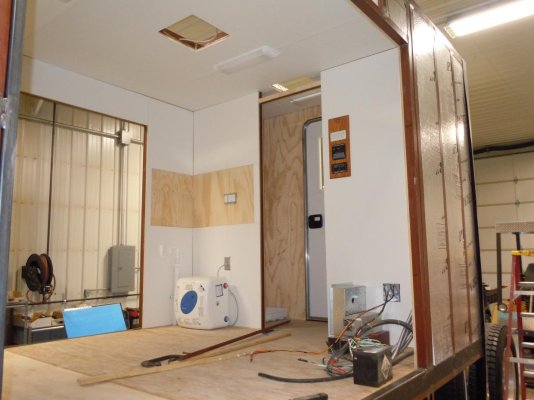
The plan was to attach some wood strips/studs flush along side the steel studs, not on top of them. Then secure a layer of plywood to the wooden studs using glue and staples and using the steel studs to support the bed frame and any wall mounted storage bins I might place around the living space.

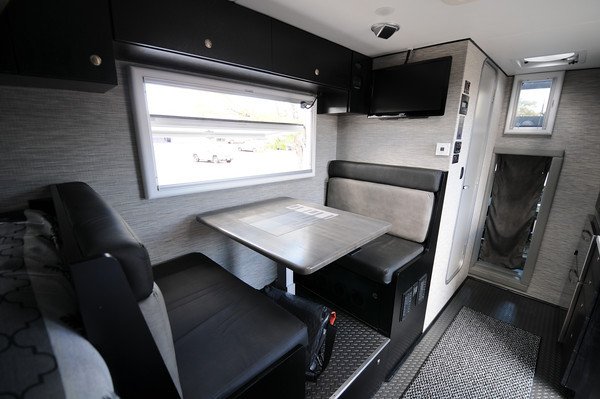
The original plan was to fit out the interior like the attached photos using a cloth covered panel for the walls. I kinda like the white/gray/black color scheme.

Would a trip to a RV surplus store prove fruitful regarding the gray cloth covered wall panels?
Attached Thumbnails
DSC3272-M.jpg   DSC3270-M.jpg  
LoupGarou is offline   Reply With Quote
Old 05-27-2014, 03:31 PM   #7
Senior Member
 
mmmc101's Avatar
 
Join Date: Feb 2009
Location: Choctaw,Okla
Posts: 174
Default

Before I went with the FRP, I obtained several samples from a local upholstery supplier. They had vinyl, cloth and foam backed materials of all kinds. They also stocked the materials needed to install it. Just another option.
Michael
mmmc101 is offline   Reply With Quote
Old 05-29-2014, 04:25 AM   #8
Junior Member
 
Join Date: Jan 2014
Location: Ofallon
Posts: 17
Default

Quote:
Originally Posted by mmmc101 View Post
Before I went with the FRP, I obtained several samples from a local upholstery supplier. They had vinyl, cloth and foam backed materials of all kinds. They also stocked the materials needed to install it. Just another option.
Michael
Thanks Michael!

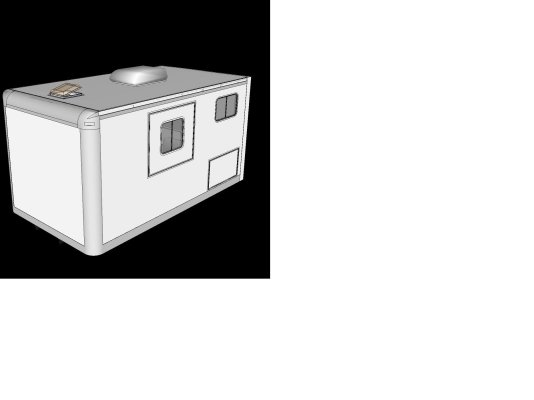
Here's some Sketch-up views of the exterior.
Attached Thumbnails
PassangerSide.jpg   DriversSide.jpg  
LoupGarou is offline   Reply With Quote
Old 05-29-2014, 07:05 AM   #9
Senior Member
 
RLPRACING's Avatar
 
Join Date: Apr 2012
Location: Elyria
Posts: 108
Default

"Would a trip to a RV surplus store prove fruitful regarding the gray cloth covered wall panels?"

I found the selection to be low so it would be better to call a few and ask what they had in inventory if you have very far to drive.

I like your wood stud idea and should work great.

Plans look great!
RLPRACING is offline   Reply With Quote
Old 05-30-2014, 11:15 AM   #10
Junior Member
 
Join Date: Jul 2010
Posts: 13
Default

I just wanted to add my $.02 regarding lining the walls with fabric...

We have found that no matter how sealed, or pressurizing the box while long dirt road drives... You interior will get a little dusty. Thus, hard sided walls made it easier come "clean-up" day. Hard sided walls also don't collect cooking smells and moisture if you plan on going to tropic environments.
Joaquin Suave is offline   Reply With Quote
Old 06-04-2014, 04:24 AM   #11
Junior Member
 
Join Date: Jan 2014
Location: Ofallon
Posts: 17
Default

Quote:
Originally Posted by mmmc101 View Post
....I lined the inside of mine with 17/32 plywood. I then glued the FRP to that. I used it on the entire interior.
Michael

Did you use inside corner trim where the FRP ceiling panels joined the FRP wall panels?
LoupGarou is offline   Reply With Quote
Old 06-04-2014, 02:08 PM   #12
Senior Member
 
mmmc101's Avatar
 
Join Date: Feb 2009
Location: Choctaw,Okla
Posts: 174
Default

No I did not use the FRP corner trim. Didn't like the looks of it. The ceiling/corners will be trimmed in red oak and stained to match the cabinets. I did use the FRP trim between the ceiling sheets. (seen in photo's).
MMM
Attached Thumbnails
DSCN0110.jpg  
mmmc101 is offline   Reply With Quote
Old 07-02-2014, 05:00 AM   #13
Junior Member
 
Join Date: Jan 2014
Location: Ofallon
Posts: 17
Default

Still waiting on the windows.

LoupGarou is offline   Reply With Quote
Old 07-09-2014, 04:40 AM   #14
Junior Member
 
Join Date: Jan 2014
Location: Ofallon
Posts: 17
Default

Quote:
Originally Posted by LoupGarou View Post
Still waiting on the windows.

Sorry, there was supposed to be a picture there.

LoupGarou is offline   Reply With Quote
Old 07-09-2014, 11:12 PM   #15
Senior Member
 
bushpilot's Avatar
 
Join Date: Jul 2011
Location: Tomball
Posts: 1,414
Default

that rear window (?) in yellow...over the storage door....is there a way to line it up w/ either the storage door or the other window (closer to the entry door) ? it might look a little nicer if things were aligned.
__________________
Don R.
'04 Haulmark (M42386) 42', 2 slide, 10kw - Pictures
'04 F350 CrewCab Longbed 4x4, 50g aux tank & gear vendors dbl over
bushpilot is offline   Reply With Quote
Old 07-10-2014, 04:32 AM   #16
Junior Member
 
Join Date: Jan 2014
Location: Ofallon
Posts: 17
Default

Quote:
Originally Posted by bushpilot View Post
that rear window (?) in yellow...over the storage door....is there a way to line it up w/ either the storage door or the other window (closer to the entry door) ? it might look a little nicer if things were aligned.
The internal layout had a lot to do with the window placement. I started with the Greene's build and made a few changes.
LoupGarou is offline   Reply With Quote
Old 07-16-2014, 01:06 PM   #17
Senior Member
 
Join Date: Mar 2013
Location: Pembroke Pines
Posts: 112
Default

looks like your really getting a ton accomplished... and it looks great! keep the pictures and questions coming...
bydesign is offline   Reply With Quote
Old 07-17-2014, 05:19 AM   #18
Junior Member
 
Join Date: Jan 2014
Location: Ofallon
Posts: 17
Default

Quote:
Originally Posted by bydesign View Post
looks like your really getting a ton accomplished... and it looks great! keep the pictures and questions coming...
Thanx, that means a lot!

Most of the effort so far goes to a local builder of mobile event trailers. I don't have the luxury of a large staging area out of the weather to do the exterior shell work myself.

The dinette will be placed at the concession window opening. Its hard to see but there's a window installed within the concession window, but its the wrong size. They discovered the error and plan to make it right.

__________________

LoupGarou is offline   Reply With Quote
Reply


Posting Rules
You may not post new threads
You may not post replies
You may not post attachments
You may not edit your posts

BB code is On
Smilies are On
[IMG] code is On
HTML code is Off
Trackbacks are On
Pingbacks are On
Refbacks are On


Powered by vBadvanced CMPS v3.2.3

All times are GMT -5. The time now is 03:53 AM.


Powered by vBulletin® Version 3.8.8 Beta 1
Copyright ©2000 - 2024, vBulletin Solutions, Inc.
×