|
08-16-2012, 11:24 PM
|
#1
|
Senior Member
Join Date: Feb 2009
Location: St. Paul, MN
Posts: 1,819
|
Liftco slide repair
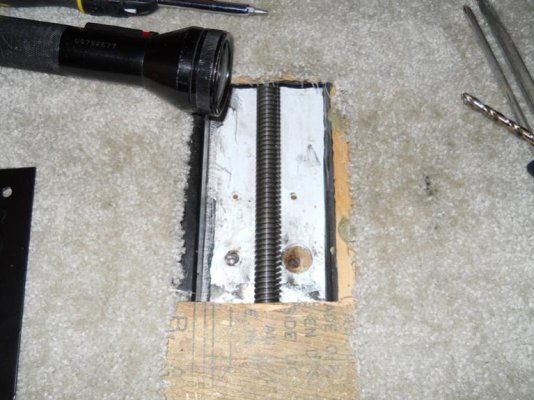
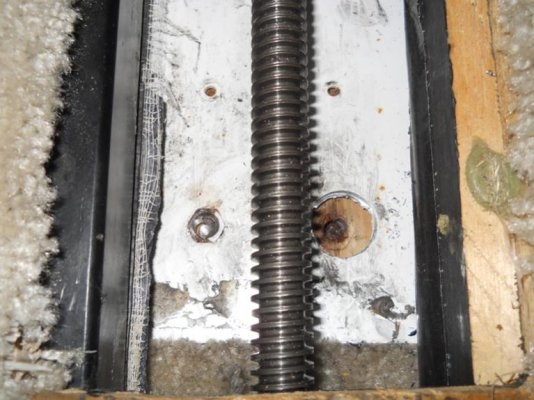
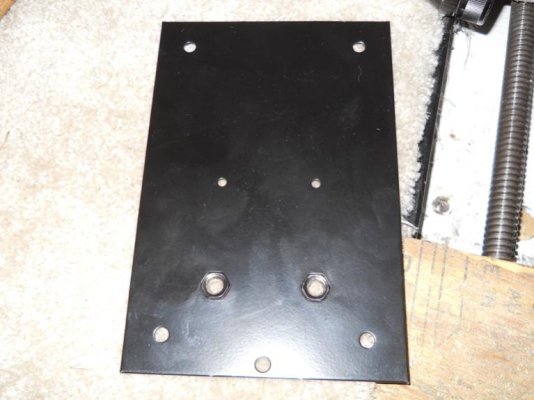
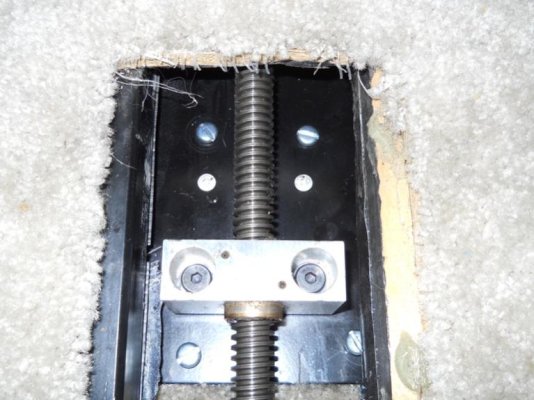
My slide is a Liftco, vintage about 2002. It's a pretty small one, just the sofa slides out. It's got an electric motor that drives a threaded rod. There is a lateral connecting rod that goes to a gear type box that then turns another threaded rod. These two rods drive the slide in and out. It's worked very well for the 3 years I've owned it. Until July 4th. I was running the slide out and heard a "clunk" kinda sound and then it shifted a bit and then another "clunk." Then it quit moving. The motor kept turning. The rods were turning (I had a kid push the button while I looked up from underneath to see them turning). The slide moved in and out pretty easily by pushing. I found some access panels under the sofa. Lift them out and can see the rods. When the slide was in the right spot I could see there are these aluminum blocks with brass inserts that the threaded rods go through. These blocks are supposed to be bolted down to a large metal plate. The bolts had broken. Two bolts in each block. I'm guessing maybe one of the bolts in each one might have been broken for some time? Just because I find it hard to believe all four bolts broke at the same time. So, just have to remove the broken bolt from the plate, right? There are captive type nuts attached to the underside of these plates. No access from underneath. The bolts all broke off flush with the nuts. Nothing to grab with a vise-grip. Tried drilling a bolt and using an easy-out. Bolt is stuck solid. Broke the easy-out. Then I called Liftco for advice. They told me these bolts are designed to be the weakest link so if the slide hits something or jams the bolts will break preventing more costly damage to the unit. I told them the bolts are stuck in there. They make a repair plate that has new captive nuts. Just use a hole saw to saw out the old nuts/bolts. That creates an open area for the new captive nuts to rest in when you affix the new plates over the original plates. Worked on it yesterday and got it fixed. The new plates I screwed down with some pretty good sized thread cutting screws (not sheet metal self tapping ones). The original bolts were just regular looking allen head bolts. I think they used locktite on them. You want the bolts to not be tight on the blocks. The blocks need to be able to float up and down on the bolts when it's moving in and out. Otherwise it'll bind up if not perfectly aligned. And the amount of travel makes that impossible. The new plates came with shoulder bolts. 3/8" by 1". The shoulder is the main length of the bolt which is smooth and 3/8" diameter. I bolted them in but they weren't long enough and bound up. I went to Fastenal (lucky I've got one about 1/4 mile from my shop) and bought 3/8 x 1.5". Perfect. Allows the blocks to float as the room travels in and out. I used anti seize on the threads, as well as around the shoulder so the blocks won't stick. I plan to take them out every couple years and lube with anti seize so they don't get stuck in the threads like the originals did. I think the shoulder bolts should be stronger too, since they have that larger diameter of the shoulder and when tightened down to the plate that should stabilize the bolt and add strength, shouldn't it? I didn't find anything about this when I searched after I broke it so figured I'd post this just in case anybody else has a similar problem. I took a couple pictures, let's see if I can get them to show up.
__________________
__________________
'03 Freightliner FL112, 295" wheel base, with '03 United Specialties 26' living quarters, single screw, Cat C12 430 h/p 1650 torque, Eaton 10speed , 3.42 rear axle ratio
|
|
|
08-16-2012, 11:25 PM
|
#2
|
Senior Member
Join Date: Feb 2009
Location: St. Paul, MN
Posts: 1,819
|
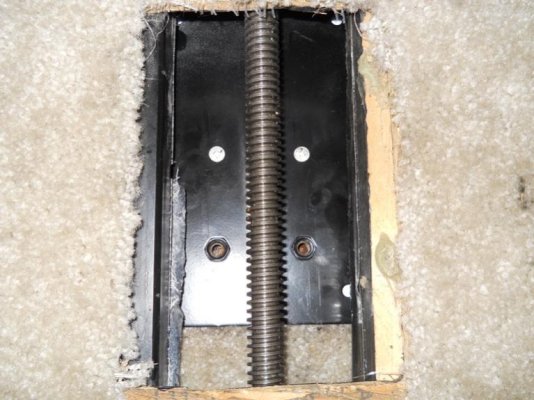
And the finished picture.
__________________
__________________
'03 Freightliner FL112, 295" wheel base, with '03 United Specialties 26' living quarters, single screw, Cat C12 430 h/p 1650 torque, Eaton 10speed , 3.42 rear axle ratio
|
|
|
08-21-2012, 01:00 AM
|
#3
|
Senior Member
Join Date: Dec 2003
Location: Grand Forks BC Canada
Posts: 170
|
Nice of Liftco to make a sensible repair plate-somebody using their head for something other than growing hair.
|
|
|
08-22-2012, 07:33 PM
|
#4
|
Senior Member
Join Date: Aug 2009
Location: Rockford
Posts: 490
|
Bob you better quit giving Buck rides on the couch.
|
|
|
08-22-2012, 09:56 PM
|
#5
|
Senior Member
Join Date: Feb 2009
Location: St. Paul, MN
Posts: 1,819
|
Ha, he does like riding on it. I don't think his 9 lbs broke those bolts though.
__________________
'03 Freightliner FL112, 295" wheel base, with '03 United Specialties 26' living quarters, single screw, Cat C12 430 h/p 1650 torque, Eaton 10speed , 3.42 rear axle ratio
|
|
|
08-23-2012, 03:50 AM
|
#6
|
Senior Member
Join Date: Jan 2011
Posts: 527
|
on one hand it is nice they have that specialized repair part for you, on the other hand the fact that they have that specialized repair part for you means this is an ongoing problem with their slide.
|
|
|
08-23-2012, 10:51 AM
|
#7
|
Senior Member
Join Date: Feb 2009
Location: St. Paul, MN
Posts: 1,819
|
Yes, I agree somewhat. But, it does make sense to have a weak link to protect the structure. The problem came because the builder put the bolts in with red locktite I believe. Or else they put nothing on the threads and over 10 years they managed to weld themselves in there. The broken parts were stuck in there solid. The new ones I put in are liberally lubricated with anti seize. So, hopefully if they break again I'll have no trouble removing the broken bits. And, if they don't come out it shouldn't be too hard to unscrew the new plates and get a vise grip on the back side and spin it out. I might even take the bolts out every couple of years and re-lube, if I remember to that is.
__________________
'03 Freightliner FL112, 295" wheel base, with '03 United Specialties 26' living quarters, single screw, Cat C12 430 h/p 1650 torque, Eaton 10speed , 3.42 rear axle ratio
|
|
|
06-16-2013, 12:25 AM
|
#8
|
Junior Member
Join Date: Jun 2013
Location: portsmouth
Posts: 2
|
Hey bob , great info on the slide , just found out my liftco slide had only 1 bolt on each block holding the blocks in place.then one side broke the other bolt off flush . , like you broke off a easy out in it trying to get 1 of the bolts out , was going to take my rv down to the machine shop and possible have them drilled and tapped new threads this week. didn't know if I should do that or call liftco and get the repair plates , Does the repair kit cost anything ? Also how do the 2 bolts in each block tighten down if there is bottom to the new plates ? , they look as if the bolts will thread right thru it .
Appreciate any info on this repair.
Thanks Chris
|
|
|
06-16-2013, 09:33 AM
|
#9
|
Senior Member
Join Date: Feb 2009
Location: St. Paul, MN
Posts: 1,819
|
Oh wow, I guess I forgot (or didn't think, much more common) to take a picture and post the specs on the bolts I used. I got the correct bolts from Fastenal. The repair kit did have 4 new bolts in it. But, they were too short for my application. I think you want to use a bolt called a "shoulder bolt." I'll try to post a picture of one that I just grabbed off a site:
I tried using the ones that Liftco sent me but when I got them tightened down it was clearly causing that threaded rod to bend and bind. I think you want the bolts tight against that shoulder and plate. And you want that threaded block to float on the bolts as the rod is turning throughout it's travel. I'll try to remember to look and see if I saved the receipt for the bolts to tell you what the specs were on the ones I got.
As far as trying to fix what you've got, or buy their plates. I think I would just buy their plates. They weren't very expensive if I remember right. Maybe $25 for the pair? I drilled several holes in them and then used self tapping screws to bolt them down to the original metal plate there. The thing about doing it this way is that if they break again it should be pretty easy to fix. I used anti seize on the threads of the shoulder bolts. I also coated the shoulder part with anti seize to hopefully make it so the threaded blocks slide up and down on the shoulders as the slide is moving.
__________________
'03 Freightliner FL112, 295" wheel base, with '03 United Specialties 26' living quarters, single screw, Cat C12 430 h/p 1650 torque, Eaton 10speed , 3.42 rear axle ratio
|
|
|
06-18-2013, 09:42 PM
|
#10
|
Junior Member
Join Date: Jun 2013
Location: portsmouth
Posts: 2
|
hey bob, thanks again for the post, called liftco and got the kit ordered, the rep said sometimes when these rv manufactures use there slide and they use the wrong locktite when installing slideout. He also said sometimes they use the wrong bolts in which will give and flex alittle and weaken the bolt over time that cause the breakage. I mentioned to him about the bolts in the kit being alittle short for the block , so I dont know if they have included longer bolts or what, but I also have a fastenall right down the road from me so getting the correct bolt will be fine , he just said to make sure the block can glide up and down so it does not get in a bind. I ll keep you posted on the fix.
|
|
|
06-18-2013, 11:55 PM
|
#11
|
Senior Member
Join Date: Feb 2009
Location: St. Paul, MN
Posts: 1,819
|
Yes, I think the builder didn't even use shoulder bolts. I think they just used regular straight type bolts and locktighted them in. At least my builder used two bolts on each one. I can't believe your builder only used one bolt on each one. Who built that coach?
__________________
__________________
'03 Freightliner FL112, 295" wheel base, with '03 United Specialties 26' living quarters, single screw, Cat C12 430 h/p 1650 torque, Eaton 10speed , 3.42 rear axle ratio
|
|
|
|
Posting Rules
|
You may not post new threads
You may not post replies
You may not post attachments
You may not edit your posts
HTML code is Off
|
|
|
|
» Recent Threads |
|
|
|
|
|
|
|
|
|
|
|
|
|